When dealing with an abandoned framing project, there’s almost always a surprise or two waiting—especially when it comes to the roof system. In this fifth installment of the Abandoned Framing Project series, we’re tackling one of the trickiest and most misunderstood tasks in residential construction: how to cut overframed roofs.
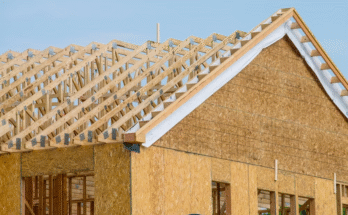
Overframed roofs, also known as California roofs, involve adding a secondary roof structure on top of an existing main roof. This technique is commonly used when combining multiple rooflines or creating dormers, extended gables, and complex architectural details. While overframing can make a roof visually appealing and structurally functional, it requires precision, planning, and solid carpentry skills.
In this abandoned project, several areas of the roof had been partially overframed, but much of it was incomplete, poorly aligned, and incorrectly cut. Fixing these mistakes meant understanding the fundamentals of overframing, recutting rafters, correcting roof pitches, and tying everything together structurally.
Step 1: Understanding Overframed Roofs
Before we even picked up a saw, we needed to analyze what we were working with. An overframed roof is essentially a roof built on top of another roof plane. Instead of cutting into the existing framing and altering its structure, you build a secondary roof above it. This method is common when:
- Adding a dormer to an existing roof
- Extending a gable roof over a porch or addition
- Creating multi-level roof designs
- Blending new construction with an existing home
Unlike conventional rafter systems, overframed roofs rely on sleeper boards and secondary rafters installed above the existing sheathing or framing. This creates a layered approach that preserves the integrity of the original roof while allowing new designs.
However, mistakes in layout, rafter cutting, or pitch calculations can lead to serious problems—sagging ridges, wavy rooflines, poor drainage, and water leaks. In this abandoned project, we found examples of all of the above, which meant starting over on several sections.
Step 2: Assessing the Existing Roof Structure
When approaching the abandoned framing, we first evaluated the existing roof pitch, alignment, and framing quality. We discovered:
- Uneven Ridge Heights
Some of the overframed sections didn’t match the main roof elevation, causing misaligned peaks. - Improperly Cut Rafters
Several rafter tails were cut short, leaving inadequate overhangs for fascia and gutters. - Missing Sleeper Boards
Without these, overframed rafters had no consistent bearing surface, leading to dips and waves. - Incorrect Pitch Transitions
Some secondary roofs didn’t blend with the main roof pitch, causing awkward angles where valleys should have been.
These issues meant we couldn’t salvage much of the original overframing. Instead, we stripped back several sections to create a fresh start.
Step 3: Laying Out the Overframed Roof
Cutting an overframed roof starts with proper layout and measurement. Accuracy here saves hours later. Here’s the process we used:
- Establish the Roof Pitch
Using a digital level, we confirmed the main roof’s pitch at 6/12 (6 inches of rise per 12 inches of run). Any new overframing needed to match perfectly to ensure smooth transitions. - Mark Sleeper Locations
Sleeper boards are installed on top of the existing roof deck to create a flat, level bearing surface for new rafters. We snapped chalk lines to ensure straight, consistent placement. - Set the Ridge Height
We calculated the height of the new ridge by using the formula: Rise = Run × Pitch
By projecting the secondary roof’s run from the ridge to the plate line, we established an accurate elevation for a seamless tie-in. - Plan Overhangs and Eaves
One common mistake is failing to leave enough material at rafter tails for fascia boards and soffits. We added an extra 2 inches to each cut to ensure proper overhangs.
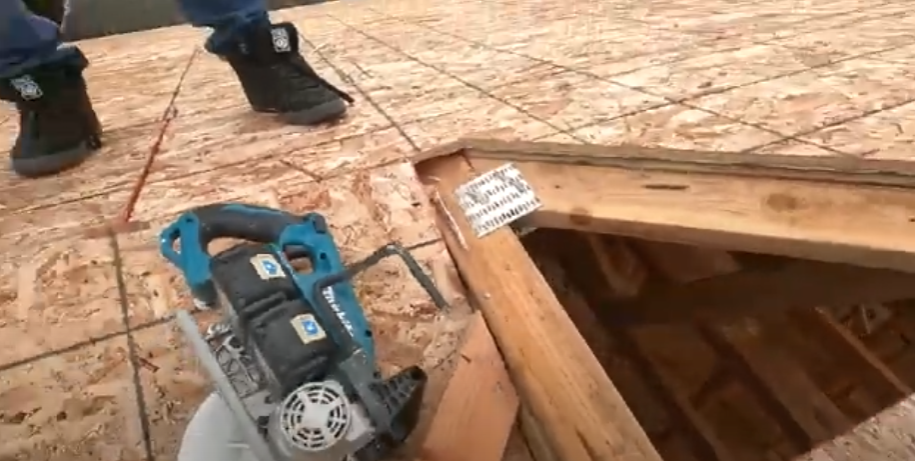
Step 4: Cutting Overframed Rafters Correctly
Cutting rafters for an overframed roof requires precise angles, compound cuts, and attention to detail. Here’s the step-by-step method we used:
1. Calculate the Plumb Cut
The plumb cut at the rafter’s top connects to the ridge board. Using a framing square or digital angle finder, we marked the 6/12 pitch accurately.
2. Determine the Seat Cut (Birdsmouth)
For rafters sitting on sleeper boards, we cut a modified birdsmouth that accounted for the height of the sleeper plus the thickness of the existing roof sheathing. This ensured a snug, level bearing point.
3. Adjust for Overframing Thickness
Unlike standard rafters, overframed rafters must account for added layers—existing shingles, sheathing, and sleepers—when determining final lengths.
4. Cut Rafter Tails
We kept rafter tails consistent at 18 inches for uniform eaves, using a stop-block jig for repeatable accuracy.
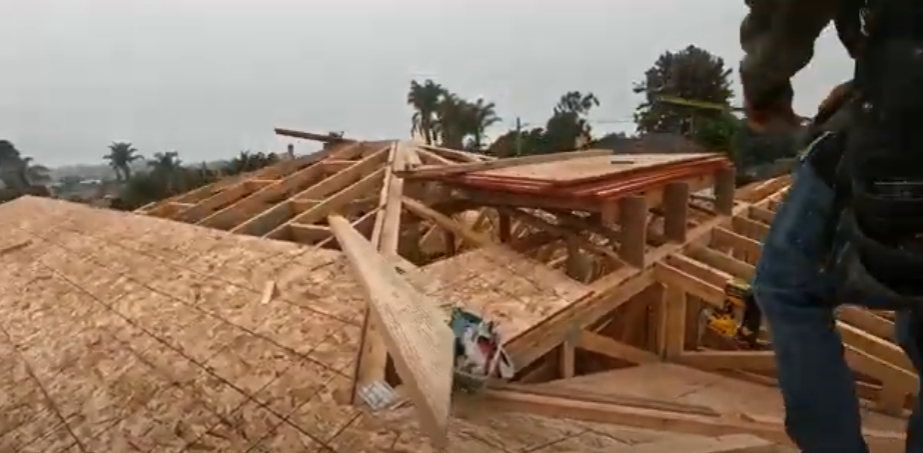
Step 5: Tying the Overframed Roof Into the Main Roof
The challenge with overframed roofs is ensuring a smooth, watertight connection between old and new roof planes. We used several strategies to achieve this:
- Proper Valley Framing
Where two roof planes meet, we installed valley boards cut at compound angles for strength and clean water flow. - Seamless Ridge Alignment
We laser-leveled the new ridges to match existing ones, preventing wavy rooflines. - Staggered Sleeper Boards
To avoid creating water traps, we staggered sleepers and left clear drainage paths beneath the new framing. - Metal Flashing Prep
We planned ahead for proper step flashing and valley flashing during the roofing stage.
Step 6: Correcting Old Mistakes
The abandoned framing left us with several problem areas that required rework:
- Re-cutting Entire Rafters: In some places, we scrapped warped or miscut rafters and replaced them entirely.
- Rebuilding Ridge Boards: Where ridge lines were misaligned, we installed new ridge boards tied securely into the existing framing.
- Leveling Sleeper Boards: Uneven sleepers caused significant dips, so we shimmed and re-secured them for consistent rafter bearing.
Every fix here was critical because any error at the framing stage would lead to costly problems later—siding gaps, leaking valleys, and uneven shingle lines.
Step 7: Safety and Precision When Cutting Overframed Roofs
Working on overframed roofs means working at complex angles and varying heights, so safety was a priority:
- We used roof brackets and secure staging for footing stability.
- Circular saws were fitted with bevel-adjustable bases for accurate compound cuts.
- We checked every cut twice before committing, avoiding costly mistakes on expensive lumber.
A key takeaway: Overframed roofs leave very little margin for error. Misalignments multiply quickly, so patience and precision are critical.
Step 8: Lessons Learned from This Abandoned Project
Through rebuilding and cutting new overframed sections, we learned several valuable lessons:
- Plan Every Cut Before Touching the Saw
Overframing requires exact calculations, not guesswork. - Sleeper Boards Make or Break the Job
Properly leveled sleepers keep rafters straight and prevent sagging. - Match Pitches Exactly
Even a slight mismatch between new and existing roof pitches can ruin the final appearance. - Use Quality Lumber
Warped or twisted rafters cause endless frustration—select straight, kiln-dried stock whenever possible. - Weatherproofing Starts at Framing
Valleys, ridges, and connections must be designed for drainage from day one.
Conclusion
Cutting overframed roofs is one of the most challenging aspects of residential framing, and this abandoned project was a perfect example of how small mistakes can snowball into major structural and aesthetic problems. By stripping back failed sections, recalculating pitches, and installing properly cut rafters, we restored strength, accuracy, and visual symmetry to the roofline.
An overframed roof adds character and complexity to a home, but only if it’s executed with precision. Correct layout, accurate cutting, and seamless integration into the existing structure are non-negotiable. In this project, we transformed what started as a poorly executed, abandoned mess into a clean, structurally sound overframed roof ready for sheathing and shingles.
With the framing now corrected, the roof not only looks better but functions better too—draining water properly, supporting loads safely, and blending seamlessly with the original design. This phase taught us that in construction, the details are everything, and getting the cuts right the first time saves weeks of frustration later.