Rafter roofing refers to a roof framework that is built using individual sloped beams. These beams, known as rafters, form the skeleton of a pitched roof and run from the top of the roof (called the ridge) down to the outer walls of the building. This traditional form of roofing has been used for centuries and remains a popular choice in both residential and custom construction projects.
While many modern buildings now use prefabricated trusses for speed and efficiency, rafter roofs—also known as stick-framed roofs—offer unmatched flexibility, customization, and aesthetic appeal. Understanding how rafter roofing works, its components, and its pros and cons is important for anyone involved in construction or home improvement.
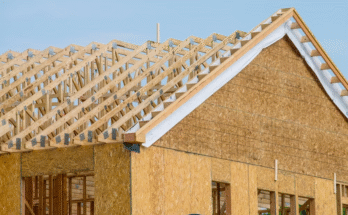
The Structure of a Rafter Roof
At its core, a rafter roof is made up of multiple key components, all working together to form a strong and stable structure. These include:
- Rafters: The primary sloped beams that extend from the ridge beam to the top of the wall. These create the slope or pitch of the roof.
- Ridge Beam or Ridge Board: A horizontal element at the peak of the roof where rafters meet. It may be structural (a beam) or non-structural (a board), depending on the design.
- Ceiling Joists: Horizontal members that span between walls and support the ceiling below. They also help prevent the walls from spreading under the load of the roof.
- Collar Ties: Short horizontal beams near the top of the rafters that prevent the rafters from pulling apart under heavy loads.
- Birdsmouth Cut: A notch in each rafter that allows it to sit securely on the wall plate.
Each rafter is carefully measured and cut on-site to fit the roof’s pitch and dimensions, making the process labor-intensive but highly customizable.
The Rafter Roofing Process
Building a rafter roof involves several steps, requiring precision, experience, and knowledge of structural loads. Below is an overview of the typical process:
1. Planning and Measuring
Before any wood is cut, detailed measurements and calculations are made to determine the roof pitch, span, overhangs, and rafter lengths. Tools like the framing square and rafter tables are used in this step.
2. Cutting Rafters
Each rafter is cut to size with appropriate angles at both ends. The birdsmouth cut ensures the rafter rests securely on the wall plate, and the top end fits snugly against the ridge board or beam.
3. Installing the Ridge
The ridge board or beam is installed at the desired height, typically supported temporarily by posts until the rafters are in place.
4. Placing the Rafters
Rafters are installed in pairs—one on each side of the ridge—usually spaced 16 to 24 inches apart, depending on building codes and roof design.
5. Securing with Joists and Ties
Ceiling joists and collar ties are added for lateral support and to reinforce the overall stability of the roof frame.
6. Adding Roof Decking
Once the rafters are secured, plywood or OSB sheathing is attached over the rafters to form the roof deck, which will support the underlayment and final roofing material.
Advantages of Rafter Roofing
Although truss systems are now common in large-scale construction, rafter roofing still holds significant advantages:
1. Design Flexibility
Because rafters are cut and built on-site, they can be customized for unique architectural features such as vaulted ceilings, dormers, skylights, and more. This flexibility is particularly valuable in custom homes or renovation projects.
2. Open Attic Space
Rafter systems often leave an open attic space, which can be used for storage, HVAC systems, or even converted into living space. Trusses, on the other hand, usually fill the attic with webs of lumber that make the space unusable.
3. Aesthetic Appeal
In some designs, the rafters are left exposed inside the home, creating a rustic or traditional look. Exposed beam ceilings are a highly sought-after design element in cabins, lodges, and craftsman-style homes.
4. Durability and Strength
When constructed correctly using quality lumber and strong connections, rafter roofs are extremely durable and able to withstand heavy snow loads, strong winds, and time itself.
5. Perfect for Small or Custom Projects
Rafter roofing is ideal for smaller structures like garages, sheds, additions, and cabins, where custom sizes or tight spaces make trusses impractical.
Disadvantages of Rafter Roofing
While rafter roofing has many advantages, it’s important to be aware of its limitations:
1. Labor-Intensive Construction
Stick framing requires skilled labor and takes significantly more time to build than installing pre-made trusses. It involves measuring, cutting, and fitting each piece manually.
2. Higher Cost in Some Cases
Although rafter roofs offer flexibility, they can sometimes be more expensive due to higher labor costs and material waste from cutting.
3. Requires Skilled Carpenters
Not all construction crews are trained in stick framing, as truss systems have become the industry standard. Finding experienced carpenters may add time and cost.
Ideal Applications for Rafter Roofing
There are specific situations where rafter roofing is the preferred or even necessary choice:
- Custom Homes: When the design calls for complex rooflines or architectural elements.
- Renovations: When matching existing rafter framing is required.
- Cabins or Rural Structures: Where transporting large trusses isn’t practical.
- Exposed Beam Designs: For aesthetic or historical restoration purposes.
- Off-Grid Builds: Where on-site flexibility is needed due to remote access or unique site conditions.
Materials Used in Rafter Roofing
The durability and performance of a rafter roof depend largely on the materials used. The main materials include:
- Dimensional Lumber: Typically 2×6, 2×8, or 2×10 boards made of pine, fir, or other structural-grade wood.
- Ridge Beams: Can be made from laminated veneer lumber (LVL), glulam, or solid timber.
- Metal Fasteners and Brackets: For securing connections between rafters, beams, and joists.
- Plywood or OSB Sheathing: Forms the roof deck that supports the shingles or metal panels.
- Roofing Material: Options include asphalt shingles, wood shakes, metal panels, clay tiles, and more.
Conclusion
Rafter roofing refers to a roof framework that is built using individual sloped beams, each carefully measured, cut, and installed to create a strong and lasting structure. Though it requires more labor and skill than modern truss systems, it offers a level of customization and architectural beauty that’s hard to beat.
Whether you’re building a small cabin, adding onto an existing home, or creating a one-of-a-kind residence, rafter roofing provides the flexibility, strength, and visual appeal that many homeowners and builders desire. As building trends continue to evolve, this timeless roofing method remains a valuable option—especially when attention to detail and craftsmanship truly matter.