Building roof rafters is a fundamental skill in carpentry and roofing. Whether you’re constructing a shed, a garage, or a house, properly measuring, cutting, and installing rafters ensures a sturdy and well-supported roof. This guide will walk you through the process step by step, covering essential calculations, tools, and techniques.
Understanding Roof Rafters
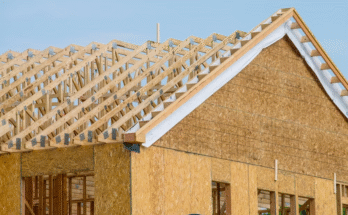
Roof rafters are the angled beams that form the framework of a roof, extending from the ridge board (the top horizontal beam) down to the walls. They support the roof decking, shingles, and other roofing materials. Before cutting and installing rafters, you must understand their components:
- Ridge Board: The central horizontal beam at the peak of the roof where rafters meet.
- Common Rafters: The main sloped beams running from the ridge to the top plate of the walls.
- Birdsmouth Cut: A notch in the rafter that allows it to sit securely on the wall’s top plate.
- Tail (Overhang): The part of the rafter that extends beyond the wall to create eaves.
- Plumb Cut: The angled cut at the top of the rafter where it meets the ridge board.
- Seat Cut: The horizontal cut that rests on the wall plate.
Step 1: Gather Materials and Tools
Before starting, ensure you have the necessary materials and tools:
Materials Needed:
- Dimensional lumber (typically 2×6, 2×8, or 2×10, depending on roof load and span)
- Ridge board (same depth as rafters)
- Nails or screws
- Roofing brackets (if needed for temporary support)
Tools Required:
- Measuring tape
- Speed square or framing square
- Circular saw or handsaw
- Chalk line
- Carpenter’s pencil
- Hammer or nail gun
- Level
- Ladder or scaffolding
Step 2: Calculate Rafter Length and Angles
The most critical part of building rafters is accurate measurement. You’ll need to determine:
- Roof Pitch (Slope) – Expressed as a ratio (e.g., 4:12 means the roof rises 4 inches for every 12 inches of horizontal run).
- Span – The total horizontal distance between the exterior walls.
- Run – Half the span (for a symmetrical roof).
- Rafter Length – Calculated using the Pythagorean theorem or a rafter table.
Manual Calculation (Using the Pythagorean Theorem)
If the roof has a 6:12 pitch and a run of 10 feet:
- Rise per foot = 6 inches
- Total rise = (6 inches × 10 feet) = 60 inches (5 feet)
- Rafter length (hypotenuse) = √(Run² + Rise²) = √(10² + 5²) ≈ 11.18 feet
Alternatively, use a rafter square or an online rafter calculator for quick results.
Step 3: Mark and Cut the Rafter
A. Marking the Plumb Cut (Top Angle)
- Place the speed square on the rafter board.
- Align the pivot point at the top edge.
- For a 6:12 pitch, find the 6-inch mark on the square’s tongue and the 12-inch mark on the blade.
- Draw a line along the square—this is your plumb cut.
B. Marking the Birdsmouth Cut
- Measure down from the top plumb cut to the rafter length (11.18 feet in our example).
- At the base, mark the seat cut (horizontal) and the vertical plumb cut to form the birdsmouth.
- The seat cut should match the wall plate width (usually 3.5 inches for a 2×4).
- The vertical cut should be deep enough to sit securely without weakening the rafter.
C. Marking the Tail (Overhang)
- Extend the rafter beyond the birdsmouth for the desired overhang (e.g., 12 inches).
- Use the speed square to mark another plumb cut at the end.
D. Cutting the Rafter
- Use a circular saw to make the plumb and seat cuts.
- Leave the line visible for accuracy—better to cut slightly outside and sand if needed.
Step 4: Test Fit and Adjustments
- Place the first rafter against the ridge board and wall plate to check fit.
- Ensure the birdsmouth sits flush and the plumb cut aligns with the ridge.
- Make adjustments if necessary before cutting the remaining rafters.
Step 5: Cutting Multiple Rafters
Once the first rafter is perfect, use it as a template to mark the others.
- Stack lumber and trace the cuts for consistency.
- Double-check each rafter before cutting.
Step 6: Installing the Rafters
- Set Up Temporary Braces – Install temporary supports to hold the ridge board at the correct height.
- Install Ridge Board – Secure it between gable ends or support walls.
- Attach Rafters – Nail the first pair of rafters to the ridge board at both ends.
- Check for Level & Plumb – Use a level to ensure rafters are straight.
- Install Remaining Rafters – Space them evenly (typically 16 or 24 inches apart).
- Add Collar Ties or Bracing (if needed for additional stability).
Step 7: Final Checks
- Ensure all rafters are securely nailed.
- Verify that overhangs are even.
- Install fascia boards and roof sheathing before shingling.
Common Mistakes to Avoid
- Incorrect Pitch Calculation – Double-check roof slope before cutting.
- Weak Birdsmouth Cuts – Don’t over-cut, as this weakens the rafter.
- Uneven Spacing – Use a spacer block for consistent gaps.
- Skipping Temporary Supports – The ridge board can sag without bracing.
Conclusion
Measuring, cutting, and building roof rafters requires precision and attention to detail. By following these steps—calculating lengths correctly, making accurate cuts, and ensuring proper installation—you can construct a stable and durable roof frame. Always prioritize safety, double-check measurements, and use quality materials for the best results. With practice, you’ll master rafter construction and be ready to tackle more complex roofing projects.