In the world of traditional roof framing, few elements are as fundamental as the rafter. Rafters form the backbone of a pitched roof system, giving it both shape and structural integrity. Unlike prefabricated trusses, rafters are built on-site, one piece at a time, requiring precision, planning, and craftsmanship. The process begins with one critical component—the ridge board. Once the ridge board is properly installed, builders carefully measure and cut each individual rafter to fit perfectly into the roof design. This sequence—setting the ridge board and cutting rafters—is the essence of traditional roof framing and plays a vital role in residential and small-scale commercial construction.
The Importance of the Ridge Board
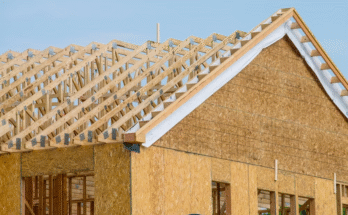
The ridge board is the horizontal member that runs along the peak of the roof. It acts as a central spine for the entire rafter system, providing a nailing surface for the top ends (or “crowns”) of the rafters. While the ridge board itself doesn’t carry a significant structural load, its positioning is critical to the success of the entire roof. If the ridge is not level or properly aligned, the rafters will not fit correctly, and the roof may be uneven, structurally weak, or prone to leaks.
Setting the ridge board is the first major step in rafter installation. Builders typically use temporary supports or scaffold towers to hold the ridge board in place. The height and level must be verified multiple times using a laser level, string line, or spirit level to ensure accuracy. This phase often involves collaboration between carpenters on opposite ends of the structure to secure the board simultaneously and keep it perfectly centered.
Measuring and Cutting Rafters
Once the ridge board is in place, the next step involves cutting each rafter to the proper size and angle. This is one of the most complex tasks in traditional framing because it involves not just simple measurements but also careful angle calculations and layout techniques.
Each rafter must be cut with two specific angles:
- Plumb cut – This is the vertical cut at the top of the rafter where it connects to the ridge board.
- Birdsmouth cut – This is the notch at the bottom of the rafter that allows it to sit securely on the top plate of the exterior wall.
To determine these angles and lengths, builders refer to roof pitch—a measure of how steep the roof is. Roof pitch is typically expressed as a ratio (e.g., 6:12), indicating the vertical rise over a 12-inch horizontal run. Using this ratio, builders can use a framing square, angle calculator, or even rafter tables to mark out accurate cuts. For more complex roofs with dormers or multiple slopes, these calculations become even more intricate.
Craftsmanship in Rafter Framing
What sets traditional rafter framing apart from truss installation is the level of craftsmanship involved. Each rafter is measured, cut, and installed individually. This allows for a high degree of customization and flexibility—especially useful for homes with unique architectural features or additions.
Experienced carpenters often begin with a “template rafter.” They carefully measure and cut one rafter, test-fit it in position, and then use it as a guide for cutting the remaining rafters. This helps maintain consistency and reduces the chance of error. The precision of this work ensures that the rafters meet evenly at the ridge, distribute loads correctly, and create a stable framework for the roof sheathing and finish materials.
Types of Rafters
There are several different types of rafters, each serving a unique function in roof construction:
- Common rafters – These are the primary load-bearing rafters that extend from the top plate to the ridge board.
- Hip rafters – Found on hip roofs, these run diagonally from a corner of the structure to the ridge.
- Valley rafters – These form the inside angle where two roof sections meet and channel water toward the valleys.
- Jack rafters – These are shorter rafters that span between the top plate and a hip or valley rafter.
Each of these rafter types must be precisely cut and positioned to maintain the roof’s strength and aesthetic symmetry.
Challenges in Rafter Installation
While building with rafters allows for flexibility and customization, it also comes with several challenges. One of the biggest issues is labor intensity. Cutting and installing each rafter requires time, experience, and physical effort—especially in hot or cold weather, or when working at significant heights.
Another challenge lies in accuracy. Small errors in measurement or angle cuts can result in misaligned rafters, uneven roof surfaces, or structural weaknesses. That’s why many builders prefer to use jigs and repeatable systems to increase consistency and reduce waste.
Weather can also be a major factor. Since rafter framing is done on-site, rain, snow, or high winds can delay progress or create unsafe working conditions. This is one reason why some builders prefer trusses, which arrive pre-assembled and can be set quickly with a crane.
When Rafters are Preferred Over Trusses
Despite the popularity of pre-engineered trusses, rafters are still favored in many scenarios. Custom homes, renovations, and projects with tight access points often call for hand-framed roofs using rafters. Because they are built on-site, rafters allow for real-time adjustments, which is valuable when dealing with out-of-square walls, irregular layouts, or historical restorations.
Rafters are also ideal for open-concept designs. Unlike trusses, which typically include bottom chords and webbing that obstruct ceiling space, rafters can be installed with a vaulted or cathedral ceiling in mind. This opens up the interior space and adds architectural beauty to the room below.
Structural Considerations
Although ridge boards don’t carry weight, rafters transfer roof loads to the exterior walls and down to the foundation. Therefore, rafter systems must be paired with proper ceiling joists, collar ties, or ridge beams—depending on the span and roof design—to resist outward thrust and prevent the walls from bowing. In larger buildings or those in areas with heavy snow loads, engineers may specify stronger materials or structural reinforcements.
Conclusion
Framing a roof with rafters is a time-honored tradition in construction that blends geometry, physics, and craftsmanship. The process begins with one simple but vital step: setting the ridge board. From there, each rafter is carefully measured, cut, and installed with precision to ensure a strong, balanced roof system.
While more labor-intensive than modern trusses, rafters offer greater design flexibility and are especially suited to custom construction. For builders who appreciate the art of carpentry and the satisfaction of a perfectly cut joint, rafter framing remains a rewarding and respected skill. Whether working on a rustic cabin, a suburban home, or a complex architectural renovation, the process of setting the ridge board and cutting each rafter is a clear reminder that great construction starts with strong, well-crafted foundations.