Stick framing, also known as conventional framing, is the traditional and time-tested method of roof construction used in residential and light commercial building for centuries. In this method, individual pieces of lumber—commonly called “sticks”—are cut and assembled on site to create the skeleton of the roof. These components typically include rafters, ridge boards, collar ties, and ceiling joists, all connected to form a durable and supportive roof structure.
Unlike pre-engineered trusses, which are manufactured off-site and delivered ready for installation, stick framing involves measuring, cutting, and fastening each piece by hand or with the help of power tools. This approach offers flexibility and adaptability in architectural design and can accommodate custom roof shapes, dormers, cathedral ceilings, and unique angles that may not be feasible with prefabricated trusses.
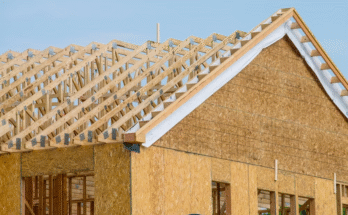
Components of Stick-Framed Roofs
To understand the stick framing process more deeply, it’s essential to be familiar with the primary structural elements involved:
- Rafters – These are the main diagonal beams that run from the ridge board (the peak of the roof) down to the top of the exterior walls. Rafters support the roof deck and roofing material and are typically spaced 16 to 24 inches apart.
- Ridge Board – A horizontal board located at the highest point of the roof, the ridge board provides a surface for rafters to attach to on either side of the roof.
- Collar Ties – Horizontal members connecting opposing rafters near the ridge, collar ties help prevent the rafters from pulling apart under heavy wind or snow loads.
- Ceiling Joists – These run horizontally between the walls and help support the ceiling below while also resisting the outward thrust of the rafters, maintaining the overall stability of the roof.
- Purlins and Bracing – In some designs, purlins (horizontal members) and diagonal bracing are added to reduce rafter span and increase load-carrying capacity.
Advantages of Stick Framing
1. Flexibility in Design:
One of the biggest advantages of stick framing is its architectural flexibility. Builders and designers can create complex or customized roof lines, such as gables, hips, valleys, and dormers, without being limited to the configurations available in pre-made trusses.
2. On-Site Adaptability:
Because the framing is done on site, adjustments can be made during construction to accommodate field conditions, unexpected changes, or modifications in the design.
3. Spacious Attics and Vaulted Ceilings:
Stick framing can provide more usable attic space and allows for vaulted or cathedral ceilings. Unlike trusses, which often include webbing that limits headroom, stick framing can leave open spaces suitable for storage or living areas.
4. Traditional Craftsmanship:
For builders who value the craftsmanship of carpentry, stick framing provides the opportunity to apply traditional woodworking techniques and skills, which some argue result in a stronger, more resilient structure when properly executed.
Disadvantages of Stick Framing
1. Labor Intensive:
Stick framing requires skilled labor, more man-hours, and careful planning. This can lead to longer construction times compared to using trusses, which arrive ready to install.
2. Material Waste:
Since pieces are cut on site, there can be more wood waste from offcuts and mistakes. Efficient planning and precise cutting are essential to minimize waste.
3. Weather Dependency:
Because the process happens outdoors, it can be delayed by adverse weather conditions. Trusses, being pre-fabricated, can be installed quickly, even in tighter weather windows.
4. Code Compliance and Engineering:
Stick-framed roofs must be carefully designed to meet building codes and structural requirements. In some areas with heavy snow or wind loads, trusses may be more cost-effective due to their engineered reliability.
Stick Framing vs. Roof Trusses
In today’s construction environment, stick framing is often compared to the use of engineered roof trusses. While both methods have their place, the choice between them depends on project specifics such as budget, design complexity, local climate, and the experience of the building crew.
Cost: Trusses are usually cheaper in terms of labor because they reduce on-site work and speed up construction. However, stick framing may be more cost-effective for smaller or complex projects that would require custom trusses.
Speed: Trusses can be installed in a matter of hours, whereas stick framing may take several days, depending on the size and complexity of the roof.
Design Options: Stick framing is ideal when the roof design includes irregular shapes, multiple pitches, or requires open space under the roof. Trusses are more restricted in form, though advanced truss systems can achieve more complex designs at a higher cost.
When Is Stick Framing the Best Choice?
Stick framing is particularly suitable in the following scenarios:
- Custom homes with unique roof designs
- Remodels and additions where existing framing must be matched
- Projects in remote areas where trusses cannot be easily transported
- Situations where attic space is desired for living or storage
- Historical restorations that aim to preserve traditional building methods
Building Codes and Structural Considerations
When constructing a stick-framed roof, it’s critical to follow local building codes and structural guidelines. These codes dictate rafter size, spacing, fastening methods, and load capacities. In areas prone to heavy snow or strong winds, additional reinforcements may be required, such as hurricane ties, knee walls, or engineered lumber.
Additionally, some local codes may require that roof plans be approved or stamped by a structural engineer, especially for unconventional designs or homes built in hazard zones.
Tools and Materials Used in Stick Framing
The primary materials used in stick framing include dimensional lumber (usually 2x6s, 2x8s, or 2x10s, depending on the span and load), nails or structural screws, metal connectors, and sheathing (such as plywood or OSB).
Essential tools include:
- Circular saw or miter saw for cutting lumber
- Framing square and speed square for layout
- Chalk line for straight guidelines
- Hammer or pneumatic nail gun for fastening
- Measuring tape and level to ensure accuracy
Conclusion
Stick framing remains a respected and widely used method of roof construction due to its adaptability, craftsmanship, and proven strength when properly executed. Although more labor-intensive than truss installation, stick framing gives builders and homeowners the freedom to realize architectural visions that might be otherwise limited by pre-fabricated systems. Whether you’re building a custom home, adding onto an existing structure, or working in a remote location, stick framing is a dependable, traditional choice that stands the test of time.